With the ever-evolving landscape of digital analytics, Google Analytics 4 (GA4) emerges as the cutting-edge web analytics service, poised to replace Universal Analytics by July 1, 2023. Designed to provide a more granular understanding of website traffic and user behaviors, GA4 integrates advanced machine learning to offer unmatched insights. Boasting a comprehensive suite of features including multi-platform measurement, fine-tuned privacy configurations, and insightful predictive metrics, GA4 is a pivotal tool for anyone keen on leveraging their digital presence effectively. By mastering how to setup Google Analytics on your site, you stand to gain not just data, but actionable insights that could transform your online strategies.
In this complete guide, you will get acquainted with the step-by-step process of setting up Google Analytics 4 on your website. Each section is meticulously crafted to simplify the technicalities, beginning with how to create a Google Analytics account and property. Next, you’ll learn the nuances of adding a data stream to your GA4 property, followed by instructions on installing the GA4 tag on your website using Google Tag Manager. To assure that you’re on the right track, the article will also cover how to verify the GA4 setup on your website. With detailed explanations and expert tips, this guide ensures that you’re well-equipped to navigate through the setup process with confidence, culminating in a well-rounded understanding of this powerful analytics tool.
Creating a Google Analytics Account and Property
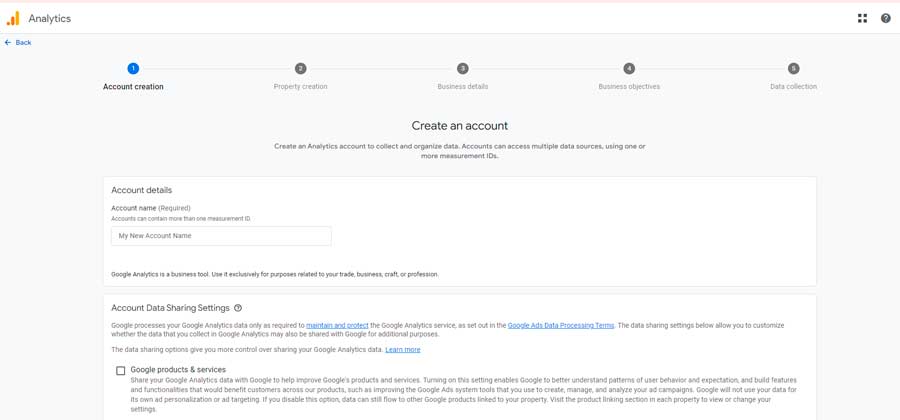
To begin the journey of harnessing the capabilities of Google Analytics 4 for your website, one must initiate the process by creating a GA4 property. Since October 2020, Google has defaulted all new properties to GA4, ensuring users are equipped with the latest in analytics technology. Here’s how to set up a Google Analytics 4 property:
Step 1: Accessing GA4 Setup Assistant
- Navigate to the Google Analytics website and sign in with your Google account.
- Locate and click on the ‘GA4 Setup Assistant’ within your Google Analytics account. This tool is pivotal in transitioning to or starting with GA4.
- If the ‘GA4 Setup Assistant’ isn’t immediately visible, verify your permissions. You should have an Editor or Administrator role for the account to proceed.
Step 2: Migrating to GA4
- Within the GA4 Setup Assistant, you’ll be presented with two options:
- ‘I want to create a new Google Analytics 4 property’ for those who prefer a hands-on approach.
- ‘I want a new Google Analytics 4 property set up for me for a more guided setup experience.
- Choose the option that best aligns with your preference and expertise.
Step 3: Installing the Google Tag
- After selecting your migration option, you’ll be prompted to set up a Google tag.
- Install this tag by copying the JavaScript snippet provided and pasting it immediately after the
<head>tag on your website’s HTML. - For those utilizing a website builder or Content Management System (CMS), you’ll need to paste this snippet into the platform’s designated area for custom HTML.
- Once the tag is in place, click ‘Done’ to finalize the creation of your GA4 property.
- It is crucial to note the name of your GA4 property for future reference and management.
For individuals or businesses managing multiple websites, it’s recommended to create a separate GA4 property for each website. This ensures distinct and accurate data collection for each domain. Repeat the above steps for each website to maintain consistency and precision in your analytics approach.
By following these steps, you will have successfully created a Google Analytics 4 property, laying the foundation for advanced data analysis and strategic decision-making for your online presence.
Adding a Data Stream to Your GA4 Property
Once your Google Analytics 4 property is established, the next pivotal step is to add a data stream so that GA4 can start collecting data from your website. Here’s how to setup Google Analytics by adding a data stream to your GA4 property:
Adding a Website Data Stream
- Navigate to Admin Section: In your GA4 property, click on the ‘Admin’ gear icon at the lower-left corner of the screen.
- Data Streams: Under the ‘Property’ column, locate and select ‘Data Streams’.
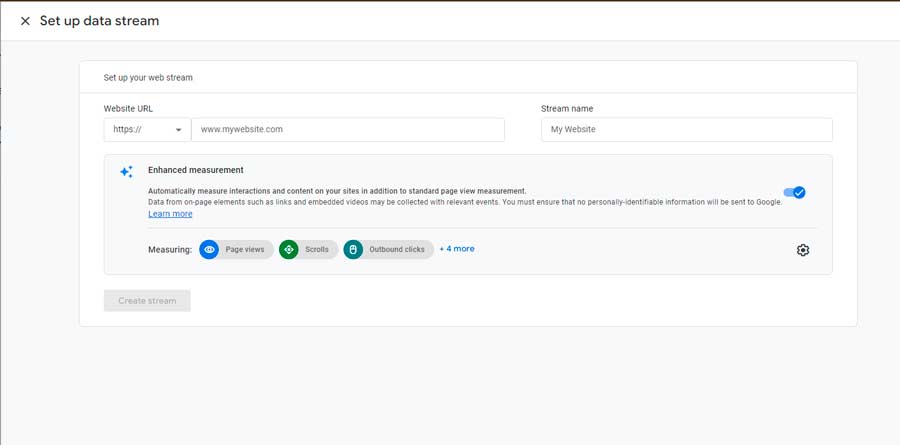
- Add Stream: Click on ‘Add stream’ and choose ‘Web’ as the platform for your website data stream.
- Enter Website Details: Provide the base URL of your website. This should be the root domain without any subdirectories or parameters.
- Stream Name: Assign a descriptive name to the data stream for easy identification.
- Enhanced Measurement: Opt for ‘Enhanced Measurement’ to automatically track key interactions such as page views and scrolls. Toggle this feature according to your tracking requirements.
- Install Tracking Code: Copy the provided GA4 tracking code snippet and paste it into the HTML source of your website, right below the opening
<head>tag.
Adding an App Data Stream (iOS or Android)
- For mobile apps, choose either ‘iOS app’ or ‘Android app’ after clicking ‘Add stream’.
- Download Configuration File: Obtain the configuration file specific to your platform (GoogleService-Info.plist for iOS or google-services.json for Android).
- Implement SDK: Integrate the Google Analytics for Firebase SDK into your application’s codebase to begin collecting data.
Understanding the Benefits of Data Streams
- Cross-Platform Tracking: GA4 data streams facilitate a unified analytics experience, allowing you to track user interactions across web and app platforms seamlessly.
- Machine Learning Capabilities: Leverage GA4’s advanced machine learning for intelligent identity resolution, enhancing the understanding of user behavior across multiple sessions and touchpoints.
- Automated Enhanced Measurements: For website streams, GA4 simplifies the tracking of essential metrics like video plays and file downloads, ensuring comprehensive data collection without manual setup for each metric.
By following these steps, you will have successfully added a data stream to your GA4 property, setting the stage for in-depth analysis and strategic insights into your website’s user interactions. Remember, you can add up to 50 data streams per property, allowing for extensive data collection across different platforms and apps. This capability is crucial for how to use Google Analytics for website and app tracking, providing a holistic view of your digital footprint.
Installing the GA4 Tag on Your Website using Google Tag Manager
After setting up your GA4 property, the next step is integrating it with your website via Google Tag Manager (GTM). This allows for efficient tag management without the need to alter your website’s code for each new marketing or measurement tag. Here is how to install the GA4 tag on your website using GTM:
Configuring the GA4 Tag in GTM
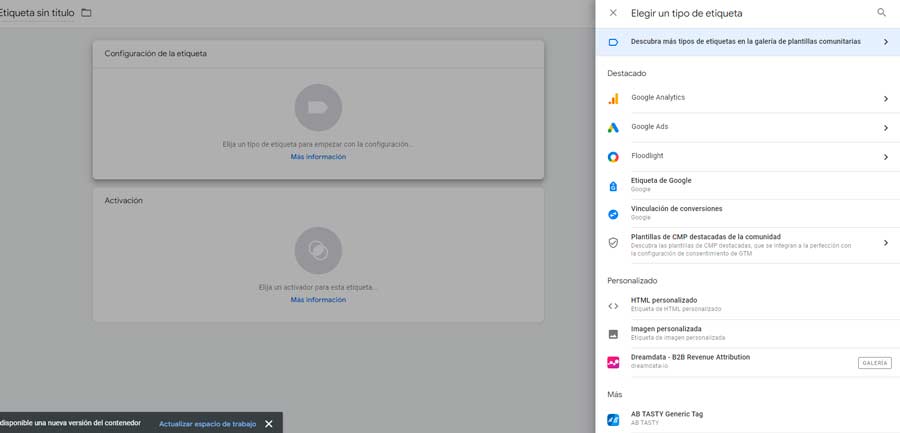
- Create a GA4 Configuration Tag:
- In your GTM dashboard, go to ‘Tags’ and select ‘New’ to create a new tag.
- Choose ‘Google Analytics: GA4 Configuration’ as the tag type.
- Enter your GA4 Measurement ID, which can be found in your GA4 property settings.
- Set Trigger for All Pages:
- Under ‘Triggering’, select ‘All Pages’ to ensure the GA4 tag fires on every page load.
- This is crucial for gathering comprehensive data across your entire website.
- Refine Tag Configuration:
- Optionally, you can configure additional settings such as global parameters and user properties.
- Define up to 25 user properties to segment your audience within your GA4 property.
Implementing Event Tracking with GA4 Tags
- Create GA4 Event Tags:
- For tracking specific events, create a new ‘Google Analytics: GA4 Event’ tag in GTM.
- Configure each event with a unique name and set the corresponding parameters.
- Custom Triggers:
- Establish triggers for these events based on user interactions, such as clicks or form submissions.
- This customization allows for granular tracking of user behavior on your site.
Testing and Verifying Tag Implementation
- Preview and Debug:
- Before publishing, use GTM’s ‘Preview’ mode to test your tags and ensure they are firing correctly.
- Address any issues that arise to guarantee accurate data collection.
- Realtime Reporting:
- After publishing, monitor the ‘Realtime’ report in GA4 to confirm that events are being tracked.
- Utilize ‘DebugView’ to troubleshoot and refine event tracking as needed.
By following these steps, you will effectively set up the GA4 tag on your website using Google Tag Manager. This setup not only streamlines the process of adding and managing tags but also enables a robust framework for collecting valuable analytics data. Remember, the precision of your data relies on the correct configuration of tags and triggers, so take the time to verify that your setup is functioning as intended.
Verifying GA4 Setup on Your Website
To ensure that your Google Analytics 4 (GA4) setup is functioning correctly on your website, it is essential to perform a series of verification steps. Here’s how to confirm that GA4 is accurately capturing and reporting your website’s data:
Inspecting the GA4 Tracking Code and Property
- Check HTML Source: Manually search the HTML source code of your website for the presence of the GA4 tracking code snippet. This code should be located immediately after the opening
<head>tag on each page of your site. - Verify Property in Account: Log in to your Google Analytics account and ensure that the GA4 property is listed. This confirms that the property exists and is ready to collect data.
- Confirm Data Stream: Within the GA4 property settings, check that the correct data stream type (Web, iOS app, Android app) is selected to match your platform.
Utilizing Tools for Validation
- Google Tag Assistant: Install and use the Google Tag Assistant browser extension to validate the GA4 setup on your website. It should indicate the presence of active GA4 tags.
- Google Analytics Debugger: Activate the Google Analytics Debugger in your browser and look for GA4-related requests and events in the console, confirming the tags are firing as expected.
- Tag Manager Preview: If you’ve implemented GA4 via Google Tag Manager, use the Tag Manager Preview mode to verify that the GA4 Configuration tag and any event tags are working correctly.
Reviewing Data and Reports
- DebugView: Access GA4 DebugView to observe real-time data collection. This feature allows you to manually inspect the flow of data and ensures that events are being tracked correctly.
- Realtime Reports: Monitor the ‘Realtime’ reports within your GA4 property to see immediate data activity. This is a strong indicator that GA4 is installed and functioning properly.
- Cross-Reference UA Reports: To compare historical data, review reports in the existing Universal Analytics (UA) property. A connection between UA and GA4 properties should have been created during the migration process using the GA4 Setup Assistant tool.
By following these verification steps, you can confidently ascertain that your website’s GA4 setup is accurate, allowing you to harness the full potential of Google Analytics for your website. Remember to check these elements regularly, especially after making changes to your website or analytics configuration, to maintain data integrity and accuracy.
Conclusion
Through this guide, we have thoroughly explored the crucial steps for implementing Google Analytics 4, equipping you with the tools necessary to leverage the power of GA4’s advanced features. By seamlessly setting up your account and property, adding data streams, and integrating GA4 tags with Google Tag Manager, your website is now prepared to harvest invaluable data to shape your digital strategy.
The analytics journey doesn’t end with setup; it’s a path marked with continuous discovery and optimization. As you proceed to engage with the insights gleaned from GA4, consider the broad implications they hold for understanding user behavior and driving business growth. Remember, the data you collect is the foundation of informed decision-making, and with GA4, that foundation is now robust and future-ready.